As any experienced welder will tell you, there are four main types of welding processes: Gas Metal Arc Welding (GMAW/MIG), Gas Tungsten Arc Welding (GTAW/TIG), Shielded Metal Arc Welding (SMAW), and Flux Cored Arc Welding (FCAW). But regardless of the type of welding that you are conducting, a thorough inspection is essential in ensuring the quality and integrity of the weld. It helps to prevent failures that could lead to dangerous consequences.
To ensure that weld quality is properly assessed, visual weld inspections are one of the primary methods used in the construction, maintenance, and manufacturing industries. In this article, we will delve into the intricacies of visual weld inspection, covering different types of welds, common quality issues, and a step-by-step process for conducting a thorough inspection.
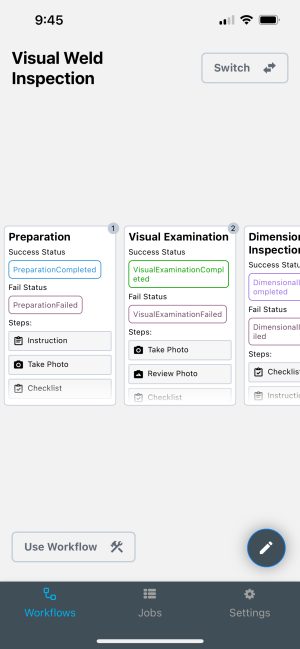
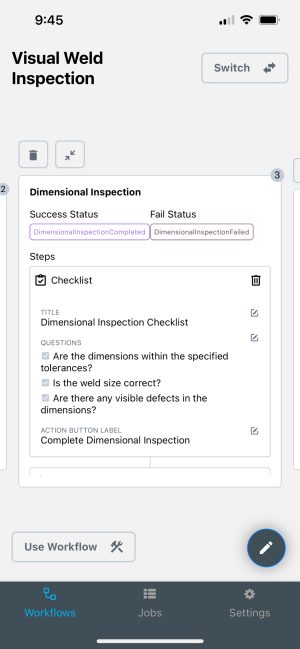
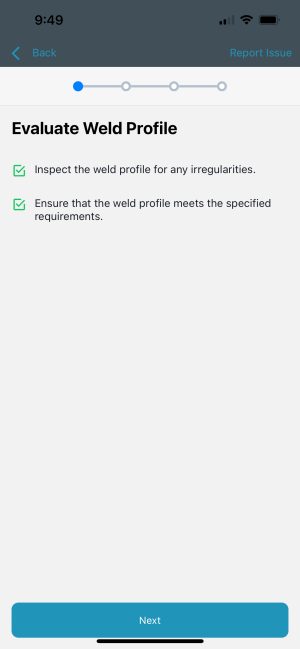
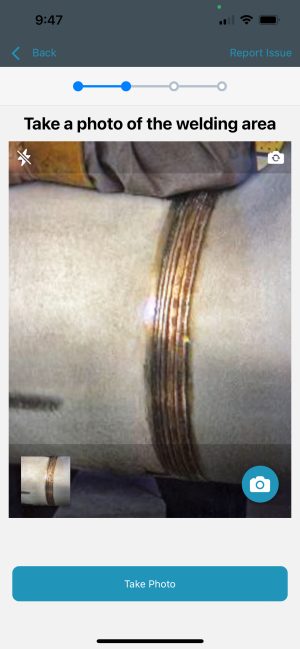
To walk you through the entire welding inspection process in as much detail as possible, we’ll be using welding inspection workflow on the Cumulus Pro app. If you’re interested in trying it out for your next inspection job, you can take advantage of a 30 day free trial by downloading it from the App Store or Google Play.
Understanding Different Types of Welds
Before diving into the inspection process, let’s go over the various types of welds commonly encountered in welding applications. Understanding the commonalities and differences between different weld types will help inform a more accurate welding inspection.
- Butt Joint: This is one of the most common types of welds where two pieces of metal are joined together along their edges in a single plane. Butt joints are widely used in structural welding, pipelines, and manufacturing.
- Lap Joint: In a lap joint, one piece of metal overlaps the other, and welding is done along the overlapping area. Lap joints are frequently used in sheet metal fabrication and automotive manufacturing.
- Tee Joint: Tee joints are formed when one piece of metal is welded perpendicularly to the surface of another piece, forming a “T” shape. They are commonly found in structural steelwork and machine frames.
- Corner Joint: Corner joints occur when two pieces of metal meet at a right angle, and welding is done along the corner. They are prevalent in box structures and frame assemblies.
- Edge Joint: In an edge joint, two pieces of metal are joined along their edges, forming a seam. Edge joints are often used in the fabrication of pipes, tanks, and vessels.
Understanding these different types of welds is crucial for conducting a thorough visual inspection, as the inspection criteria may vary depending on the weld configuration.
Common Quality Issues with Welds
While welds are intended to provide strength and durability, various factors can lead to defects or quality issues. Some of the most common quality issues encountered during visual weld inspection include:
- Incomplete Penetration: This occurs when the weld metal fails to fully penetrate the joint, resulting in weak spots and reduced strength. Incomplete penetration can compromise the structural integrity of the weld.
- Lack of Fusion: Lack of fusion happens when there is inadequate bonding between the weld metal and the base metal or between adjacent weld passes. This defect can lead to cracks and failures under load.
- Porosity: Porosity refers to the presence of gas pockets or voids within the weld metal, caused by trapped gas during the welding process. Porosity can weaken the weld and make it more susceptible to corrosion and cracking.
- Cracks: Cracks can occur due to various factors such as excessive heat input, rapid cooling, or improper welding technique. Cracks can propagate over time, leading to catastrophic failure if not detected and addressed.
- Undercutting: Undercutting is a groove or depression along the weld toe or the base metal adjacent to the weld. It weakens the weld and increases the risk of stress concentration and fatigue failure.
- Incomplete Fusion: Incomplete fusion happens when the weld metal fails to fuse completely with the base metal or previous weld passes. It can result in discontinuities and reduced strength at the fusion line.
- Excessive Spatter: Spatter refers to the metal particles expelled from the welding arc that can deposit on the surface of the weld and adjacent areas. Excessive spatter can be aesthetically unappealing and may indicate poor welding technique.
Step-By-Step Guide To Conducting Visual Weld Inspection
Now that we’ve covered the basics let’s delve into the step-by-step process for conducting a thorough visual weld inspection:
1. Preparation
Before beginning the inspection, ensure you have the necessary safety equipment, including gloves, goggles, and protective clothing. Also, gather any relevant documentation, such as welding procedure specifications (WPS) and drawings.

2. Visual Examination
Start by visually inspecting the weld for any obvious defects such as cracks, porosity, or incomplete fusion. Use proper lighting and magnification if needed to examine the weld details closely.

3. Dimensional Inspection
Measure the dimensions of the weld to ensure it meets the specified requirements in terms of size, length, and throat thickness. Use appropriate measuring tools such as calipers or a weld gauge.
4. Check Welding Parameters
Review the welding parameters used during the welding process, including voltage, current, travel speed, and shielding gas flow rate. Ensure they are within the specified range according to the WPS.
5. Inspect Weld Reinforcement
Check the weld reinforcement to ensure it conforms to the specified requirements. Excessive or insufficient reinforcement can affect the mechanical properties of the weld.

6. Evaluate Weld Profile
Assess the weld profile to ensure it is consistent and free from irregularities such as undercuts or excessive convexity. Use a straightedge or profile gauge to check for any deviations from the specified contour.

7. Examine Weld Bead Appearance
Evaluate the appearance of the weld bead, including its uniformity, smoothness, and surface finish. Any signs of discontinuities or defects should be thoroughly investigated.
8. Inspect Weld Penetration
If possible, perform a non-destructive examination (NDE) technique such as radiographic testing or ultrasonic testing to assess the depth of penetration and detect any internal defects.
9. Document Findings
Record all inspection findings, including any defects or deviations from the specified requirements. Take photographs or videos as necessary to document the condition of the weld.

10. Report And Follow-Up
Prepare a detailed inspection report summarizing the findings and recommendations for corrective actions if needed. Ensure that any identified defects are addressed promptly to prevent further issues.
Conclusion
Visual weld inspection is a critical aspect of ensuring the quality and integrity of welded joints. By following a systematic approach and understanding the different types of welds and common quality issues, inspectors can effectively identify defects and ensure compliance with industry standards and specifications.
Conducting thorough visual inspections not only helps in maintaining structural integrity but also contributes to the safety and reliability of welded structures and components. With proper training, experience, and attention to detail, inspectors can master the art of visual weld inspection and contribute to the success of welding projects across various industries.


